Fiberglass Repairs Made Easy: Common Mistakes and How to Avoid Them
Fiberglass tubs and showers are tough — but repairing them is a different story. What looks like a straightforward fix can quickly go wrong, leaving you with a patchy surface, a repair that peels off in months, or damage that’s actually worse than before you started.
At Sirfix-Alot, we’ve seen it all. And the truth is, most failed DIY fiberglass repairs come down to the same handful of mistakes — ones that are completely avoidable once you know what to look for.
Here’s what commonly goes wrong, and how to do it right.
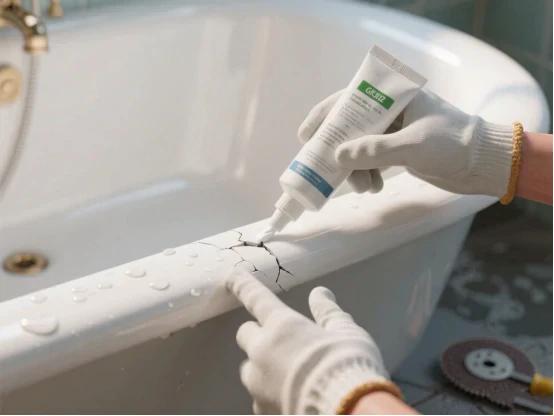
Mistake #1: Skipping the Surface Prep
This is the number one reason repairs fail. Fiberglass repair compounds need a clean, dry, lightly abraded surface to bond properly. If you apply filler over soap scum, body oils, or a damp surface, the repair will look fine at first — then lift, crack, or peel within weeks.
How to avoid it: Clean the damaged area thoroughly with an acetone-based cleaner before doing anything else. Dry it completely — and we mean completely. Then lightly sand around the edges of the damage to give the repair compound something to grip. Don’t rush this step. The prep is the repair.
Mistake #2: Using the Wrong Repair Product
Walk into any hardware store and you’ll find a shelf full of fillers, epoxies, and patch kits. Not all of them are suitable for fiberglass. Using a general-purpose filler or the wrong type of resin can result in poor adhesion, color mismatch, and a repair that breaks down quickly under moisture and heat.
How to avoid it: Always use a repair product specifically formulated for fiberglass gel coat. Check that it’s rated for wet environments. If your tub has a colored surface, look for tintable repair compounds — or better yet, consult a professional to get the color matched properly.
Mistake #3: Overfilling the Damaged Area
More filler doesn’t mean a better repair. Piling on too much compound causes it to shrink unevenly as it cures, leading to visible ridges, bubbling, and cracking — especially around the edges of the patch.
How to avoid it: Apply repair compound in thin layers, allowing each one to cure before adding the next. Build up slowly until you’re slightly proud of the surface, then sand back flush. Patience here pays off in a smooth, invisible finish.
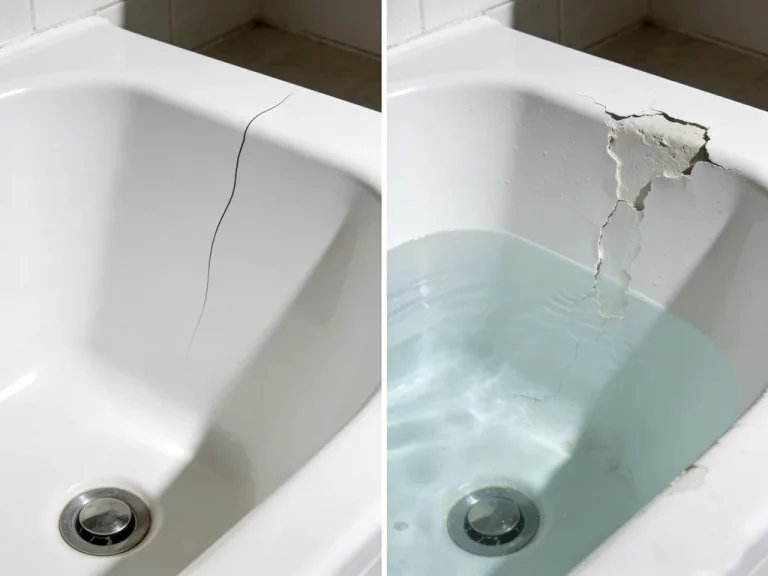
Mistake #4: Ignoring the Underlying Cause
Patching the visible crack without addressing what caused it is like putting a bandage over a broken bone. If the damage was caused by a soft or unsupported substrate, poor installation, or ongoing structural flex, the new repair will crack in the same spot within months.
How to avoid it: Before reaching for the filler, ask why the crack appeared. Press around the damaged area — does the surface flex? Is there any softness or give? If so, the substrate needs to be addressed first. A surface repair on top of compromised structure is money wasted.
Mistake #5: Poor Color Matching
Even a structurally perfect repair stands out like a sore thumb if the color is off. Fiberglass gel coats yellow and fade over time, so matching a repair to a fresh white or off-white compound almost never works on an older surface.
How to avoid it: Test any color-matched compound on an inconspicuous area first and let it cure fully before committing — the color will shift as it dries. For older or heavily discolored tubs, the best solution is often a full professional refinish rather than a spot repair, which brings the entire surface back to a uniform color.
Mistake #6: Skipping the Final Sealing Step
Sanding down the repair and calling it done is a common shortcut — and one that shortens the life of the fix considerably. Without a protective topcoat or gel coat sealer, the repaired area is exposed to water, cleaning products, and daily use without any real protection.
How to avoid it: Always finish a fiberglass repair with a compatible topcoat or sealer. This protects the repair, blends the sheen to match the surrounding surface, and significantly extends how long the fix holds up.
Mistake #7: Not Knowing When to Call a Professional
DIY fiberglass repair kits have their place — small chips in solid, well-supported surfaces with minimal color-matching demands. But many homeowners push beyond that range, attempting repairs on cracked floors, spider-cracked walls, or structurally compromised surfaces where a DIY approach simply isn’t enough.
How to avoid it: Be honest about the scope of the damage. If you’re dealing with cracks longer than an inch or two, multiple damage points, soft spots, or any sign of water infiltration beneath the surface — stop. A professional repair done right the first time will always be cheaper than fixing a failed DIY attempt on top of the original damage.
The Sirfix-Alot Difference
At Sirfix-Alot, we don’t just patch the surface — we diagnose the problem, address the root cause, and restore your fiberglass tub or shower to a finish that looks and performs like new. No shortcuts. No guesswork. No coming back in six months to do it again.
Whether you’ve got a small chip that needs a clean professional touch, or a tub that’s been through years of DIY attempts, we’ve seen it and we can fix it.
Ready for a Repair That Actually Lasts?
If your fiberglass tub or shower needs attention, don’t risk making it worse. Let the experts at Sirfix-Alot take a look — we’ll give you an honest assessment and a clear quote, no pressure.